I consider it a blessing and a curse growing up with an artist for a mother. My mom has been crafting since long before I was born, focusing on stained glass when I was young, and venturing into other avenues throughout the years. From a young age, I wanted to make things. I learned to sew when I was 8 or 9, and wanted my first project to be a sweatshirt. I’m sure my mom tried to persuade me to make something easier, like a pillowcase or something, but I wanted a sweatshirt, so I was making a sweatshirt. Which I still have, up in the attic.
My mom taught me a phrase that’s haunted me throughout the years… Oh, you could make that! And thus begun my journey to make ALL THE THINGS. When I was young, it was little animals out of clay. Then sewing bags, notebook covers, and pencil pouches for school. After college, those long four years I was devoid of my sewing machine, I learned about a little thing called Pennsic. Pennsic is an event run by the Society for Creative Anachronism, a group that reenacts the Middle Ages with battles, arts, cooking, and comradery. Pennsic itself is a two-week reenactment event, which meant I had an excuse to sew again! I needed two weeks worth of garb to wear! I was finally inspired to start making things again. I taught myself chainmail and started making my own jewelry. I researched period clothing styles and tried to recreate them. I taught myself how to crochet – knight helmets, stuffed dragons, stuffed animals for baby gifts. I learned how to use an industrial sewing machine and started sewing yurts for my friend’s company. New projects don’t worry me, I enjoy teaching myself new skills and new crafts.
Last Pennsic I discovered inkle weaving, and in the months since I have been weaving every day. I’ve made belts and trim as gifts, woven straps for archery quivers, and even started making camera straps for a few people. I’ve loved the challenge that weaving provides, and I’ve taught myself a lot of skills through the different weaving methods I’ve found. One of which is patience. Another is how to pay attention to what I’m doing so I can figure out how to fix it when I mess up.
I’m not just a weaver though. I’m not just a crocheter. Or a seamstress. Or a jeweler. I’m a maker. I make a lot of things. If someone asks me, “Can you make…” I usually cut them off with a “Yes.” before they can finish the question. When someone asks me what I make, I usually answer “… yes?” I make a lot of things. If you can think of a thing, I’ve probably made it at least once. This includes spear throwing catapults, 8-foot-tall yurts, and a chainmail shirt for a stuffed dragon.
Once upon a time, I bought a sari. It was beautiful, a stunning dark silver that I wanted to cut to make a summer dress. I bought this sari from Miriam, who I’ve gotten many saris from. You know her, she’s the one with the pile of silk in front of her shop that people are constantly bending over. If you haven’t gone sari diving yet, I highly encourage you to try.
Picture of sari from sale post on Facebook.
Look at that silver! That beautiful contrast of the black embroidery! This would have made a beautiful dress that I could wear to work at Ren Faires and Pennsic… As I do with every piece of fabric I buy (including all the saris I’ve purchased from Miriam), I washed it before getting ready to cut it. I have always done this. I have rarely had a problem.
This is what came out of the washing machine.
Houston, we have a problem.
This. This is not silver. This is not black embroidery. What even is this!?!?!?! Thus begins the saga.
I have always washed all my fabric the same way – cold water, sensitive skin detergent, low agitation. And this is what came out. There was nothing red in the load before this. There was nothing else in the washing machine with this. The iron content in my water is not high enough to do anything like this. After much debate on Facebook, two theories arose: 1.) the sari was originally pink and was overdyed gray, or 2.) the sari was woven with a non-colorfast weft of red thread. Neither of these two theories seemed very likely, but #2 seems to be the most logical.
I was left with two options, as pink is my *least* favorite color. I could either sell the sari as is, with no explanation of why it went from silver to pink, or I could try dying it. After sitting on the decision for a bit, I decided I was already into this project and I might as well see it through to the end. I decided to overdye it gray, in hopes that it would get back to something resembling the original color. This process started with a vinegar and water bath, because the internet suggested it. When that barely removed anything, I decided to use a color remover bath that I got from Michaels, in hopes to remove some of the pink. I did two rounds of the color remover, but the second round didn’t make much change. Unfortunately, it also weakened the silk a lot, so at the end of everything, the silk was very thin and had some holes it didn’t have at the beginning.
Rinsing the pink out of the sari using vinegar and water.First color remover bath, just after putting fabric into water.10 minutes into first color remover bath.Result of color remover baths. HOW IS IT MORE PINK!?!
The color remover didn’t fade the mauve. Oh no. It turned it into bubblegum. With some magenta highlights on the embroidery that used to be black. At this point I was so angry with this thing that I wanted to get rid of it, just so I never had to look at it again. But I made the choice, it was a project now, so I had to keep going. I bought gray fabric dye from Michaels, but then decided to get black instead, since I wasn’t sure a gray would cover the pink. Since the pink came from absolutely nowhere, adding gray could very well have turned this fabric green, for all I knew about it.
Dye bath ready.After only a couple minutes, the pink was already starting to disappear.After about 10 minutes in the dye bath.The final product, still wet from rinsing.
Now *this* I could work with! The black dye turned this silk into a gorgeous cloudy gray/purple.
Some of the embroidery maintained a pink tone.Most of the embroidery took on a mottled gray color.Overall color of the silk was a gray/purple blend.
Now that I had fabric in a color I really liked, I realized it no longer wanted to be a dress. I decided to make this into a Viking coat instead, lining it with a navy silk/linen blend that I’ve been holding onto for years.
Serging the silk to the linen for strength.Modeling the final coat.I used the embroidered edges as sleeves and the front edge.Details of the embroidery on the sleeves.I love the final color of the embroidery!
Despite its bumpy start, this coat ended up as one of the pieces I am most proud of making. I was also shocked at how many people followed along with this saga! I’ve had a Facebook account since college, so I’m used to posting projects on it, but the amount of comments from people following along was astounding. People came up to me at events, people I didn’t even know would recognize me, and would immediately say, “Oh my god, that pink! I can’t believe it!” I also had college friends that I haven’t spoken to in years commenting on the posts that they couldn’t wait to see what happened next.
I wore the coat to Bhakail’s Yule event in December, and people were coming up to me asking, “Is this it? Is this the sari!? ” to which I could proudly reply, “It is! And it’s so much better now that it isn’t pink!”
The final coat at Bhakail Yule. Photo by Brittany Simpson
The following is the documentation I wrote to accompany my Aztec band, back in 2019.
Itztlacoliuhqui – The Aztec God of Winter – Weaving A Legend
or
This Dude Has the Longest Name, Why Did I Decide To Weave It?
By Chana Freidl the Maker
Inspiration
My local barony, the Barony of Bhakail, hosts its A&S championship at its yearly Yule event. I was quite happy to see that the theme of 2019’s competition was “Myths and Legends” as they happen to be two of my favorite things. Thinking over my options, I knew I needed to do something more original than weaving Santa Clauses on some trim. Nothing about historical weaving patterns really screamed “Myths and Legends” to me, so I took to the internet with a general search phrase of “winter myths.”
The search brought back the expected results – Jack Frost, Krampus, St. Nicholas – none of which made for inspiring weaving material. I switched my search to “god of winter” and soon found some new material – gods from different cultures. Scrolling down the page brought me to a short story of the Aztec god of winter, Itztlacoliuhqui. As I’ve always had an interest in the anthropology and archaeology of the Americas, I read on and discovered a simple storyline explaining the inception of this god. Simple enough to weave, maybe?
Of all the stories I read in my search, this seemed the easiest to turn into weaveable designs. But how could I portray an entire story with weaving? Simply weave wavy lines to indicate the cold? I started brainstorming with a good friend and thought of something crazy. What if I wove the story? What if I literally made a storyboard with my weaving?
And thus, this piece was conceived.
The Legend
The clearest interpretation of the original legend comes from Wikipedia:
“Tonatiuh, the Sun god, demanded obedience and sacrifice from the other gods before he will move. Enraged at his arrogance, the god of dawn and the planet Venus, Tlahuizcalpantecuhtli, shoots an arrow at the Sun. However, the dart misses its mark, and the Sun throws his own back at the morning star, piercing the Lord of Dawn through the head. At this moment, Tlahuizcalpantecuhtli is transformed into the god of obsidian stone and coldness, Itztlacoliuhqui. [sic]” (https://en.wikipedia.org/wiki/Itztlacoliuhqui)
A Bit of History on the Aztecs and Their Art
The Aztec empire, primarily based in central Mexico, began its formation in the 13th century and lasted until 1521 when Spanish explorer Cortés captured the capital city of Tenochtitlan. Commonly known as fierce warriors, Aztec culture revolved around farming, architecture, and a highly structured form of government. Aztec art was incredibly elaborate, ranging from detailed paintings of everyday life to monument-sized sculptures of gods. Several examples of their art have survived the centuries and are on display at various museums worldwide.
One of the most complex and recognizable examples of their artistic talent is the Sun Stone, or Calendar Stone, which was carved around 1427 CE and was discovered in Mexico City in the 18th Century. It depicts the story of various gods’ struggle for power and command over the others in the Aztec pantheon.
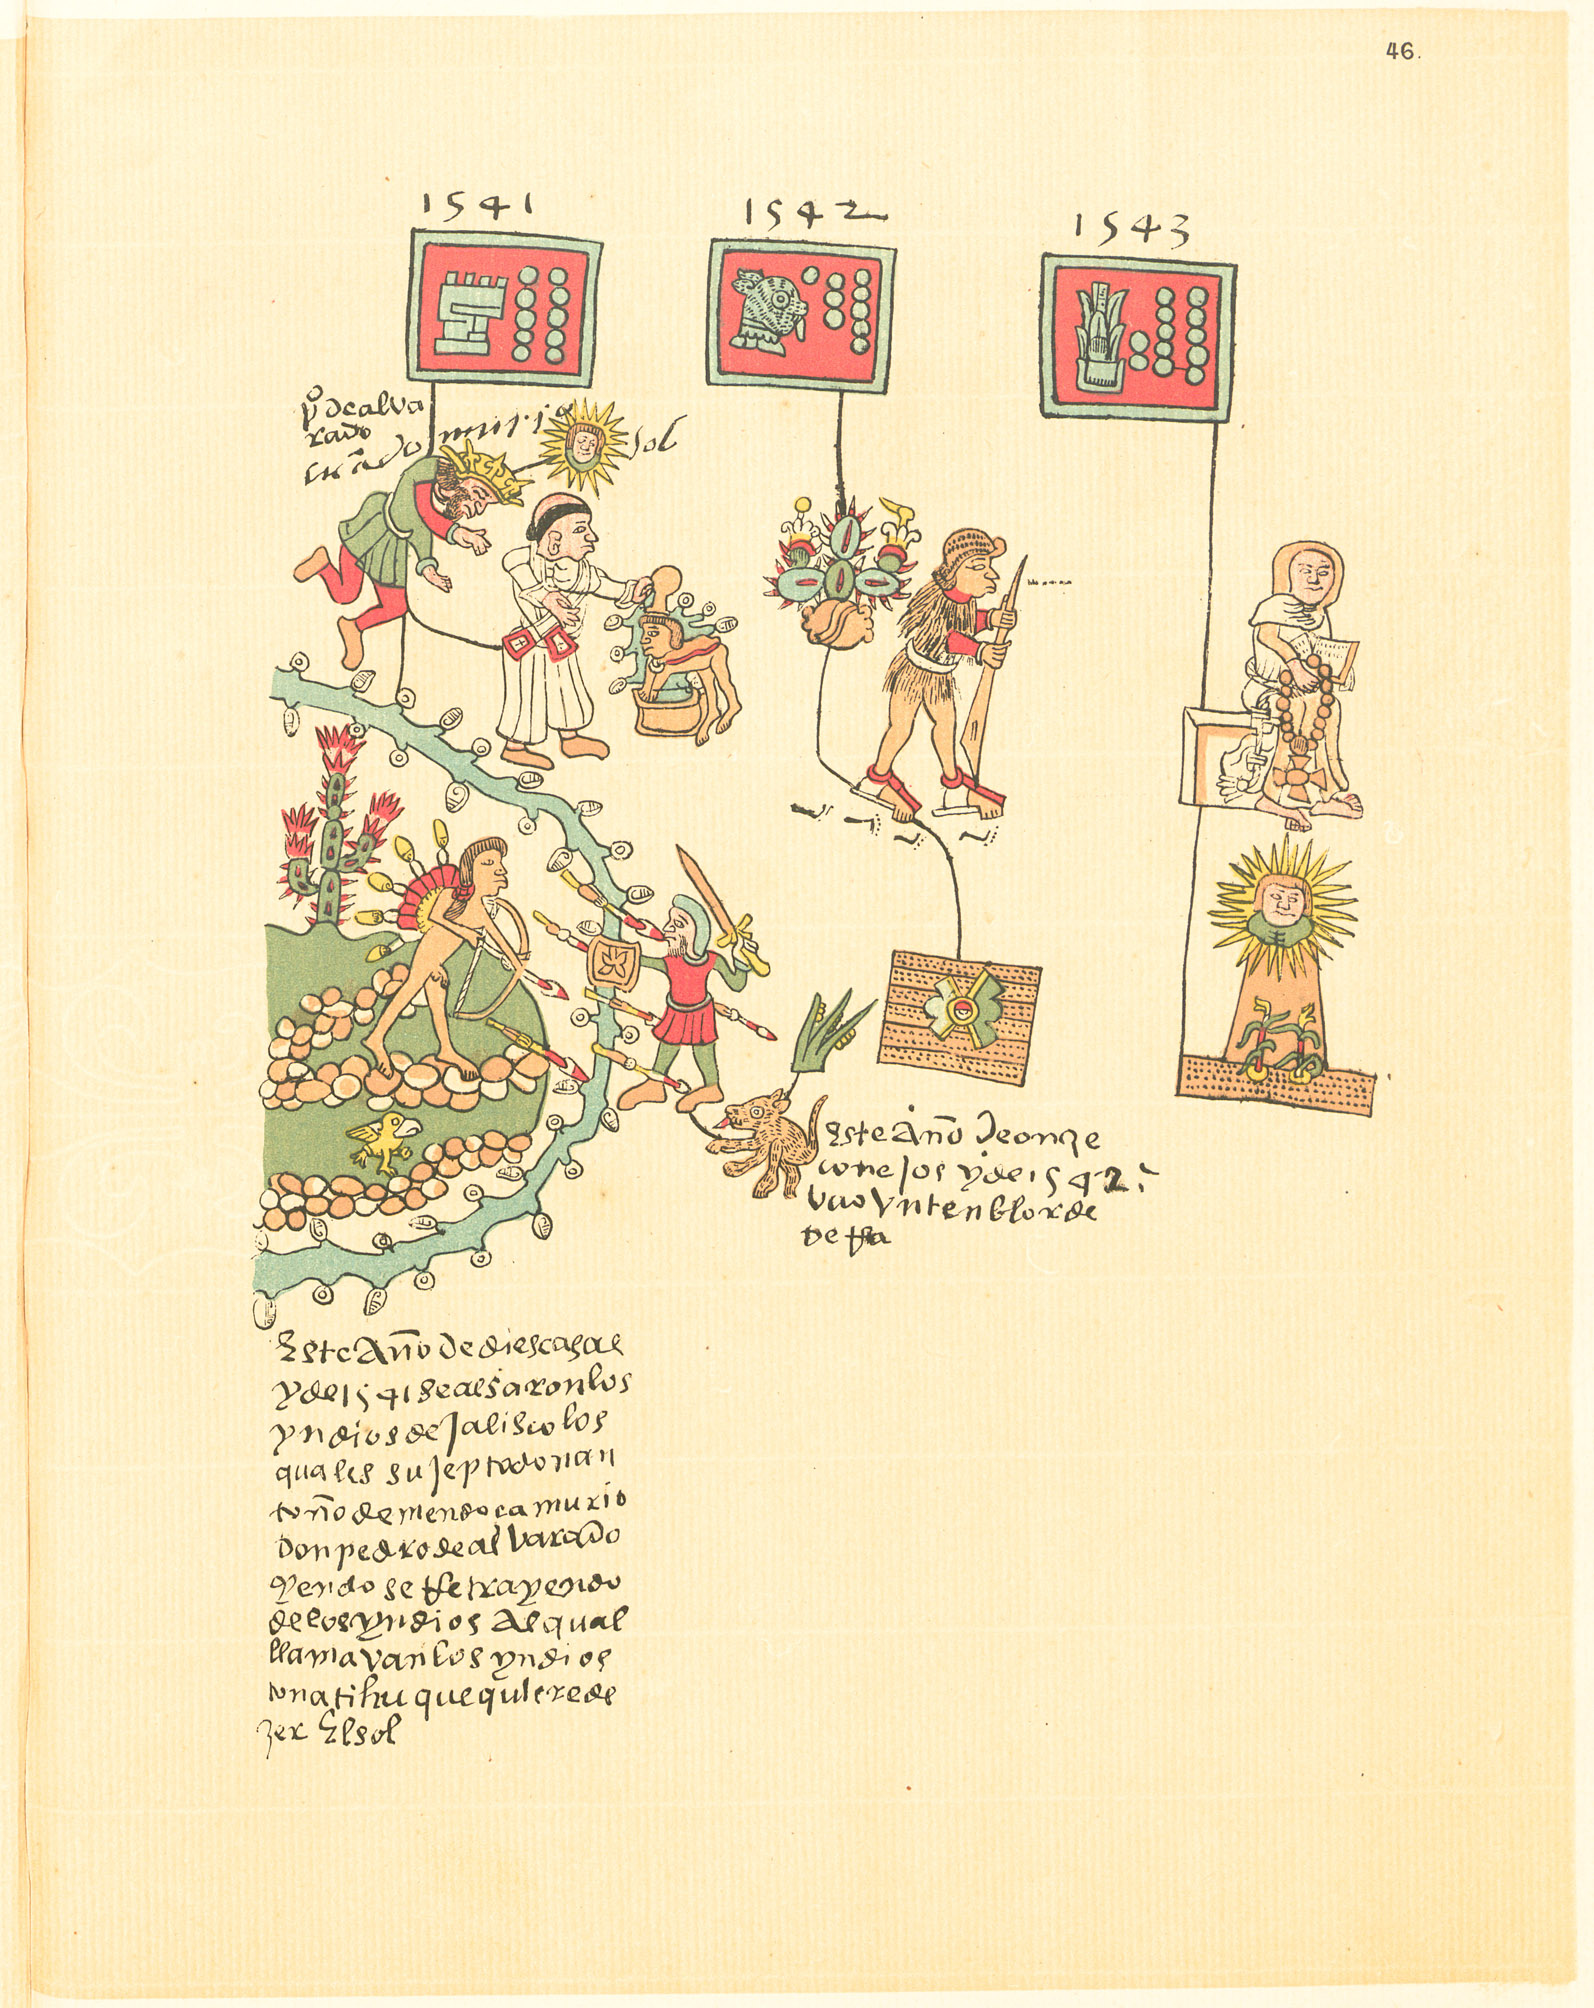
Not only did their sculptures and monuments survive, a few Aztec codices depicting their lifestyles and legends have remained in remarkable condition since their creation in the 15th century. These codices were often created by Spanish monks who worked with native peoples to learn and record cultural details. The intent was to bring them back to Spain so missionaries could learn about the people before traveling to Mexico to convert them. The Codex Telleriano-Remensis contains detailed drawings and descriptions of all the major Aztec gods in the native language of Nahuatl, the common language spoken by the people of Mesoamerica starting around the 7th century. I referenced this codex while looking for images of the Aztec gods to see if they would be simple enough to depict in weaving.
Spoiler alert: they were not.
Itzlacoliuhqui, God of Winter Tlahuizcalpantecuhtli, The Morning Star (Venus)
One look at these images told me I would have too much trouble trying to weave something so complex. Perhaps with more time and more knowledge of the craft I’d be able to produce an image with such intricate detail and color, but for the sake of the upcoming competition, I knew I needed to simplify the design immensely. I ended up deciding on a stylistic sun, star, and bow in order to get the story across clearly.
The bow and arrow is another concession I made to weaving simplicity – while the Aztecs did hunt with bows and arrows, they greatly preferred using an atlatl, which is more often depicted in their art. As more people are familiar with the image of a bow and arrow, I decided to use that instead; an atlatl is essentially a long stick with a counterweight and would not look as impressive in woven form. Another image from the Codex Telleriano-Remensis does show an illustration of an Aztec warrior using a bow and arrow:
Aztec culture placed great importance on the tasks of spinning and weaving. Infant girls were presented with weaving tools shortly after birth and were taught how to manipulate fiber and start spinning around the age of five. Girls were expected to perform every task necessary to turn fiber into finished cloth by the time they were of marrying age, fifteen years old. This included the very beginning steps of preparing the raw fibers, spinning, dying, and weaving them, and then sewing the woven pieces together if necessary. This process is documented in the Codex Mendoza, a 16th century document depicting the everyday life of the Aztec people created by a Spanish viceroy working with the Nahuatl people of the region.
To this day, weaving remains a large aspect of female culture in Mexico and Central/South America. Girls are taught to weave from a young age and women are responsible for producing most of the woven products in the area. When traveling around the region, one will almost always see markets full of handwoven products with simple designs, often made from wool or alpaca.
Materials
I usually use cotton for my weaving projects and need to explain that although it’s not period-accurate, due to cost constraints and color choices, it is the most accessible material. I was pleased to find out, however, that cotton was actually a period material in Aztec culture, though it was used as payment and tribute to the upper class. Lower class people would spin and weave their own clothing out of rougher materials such as yucca and palm fibers. Trying to find these fibers in a weavable form now would be difficult and cost prohibitive, so I stuck with cotton as originally planned.
My original intent was to purchase white cotton yarn and dye it using indigo, a native plant to the area and a natural material they would have used to dye their yarn during this period. In my research I came across something called Maya Blue, a specific color and type of pigment made for Mayan sacrificial victims and used on pottery during the same time period as the Aztecs (the Maya were located further south than the Aztecs, in the area now encompassing southern Mexico, Guatemala, and Belize). It is a mixture of indigo and clay that provides such a stable color that it is still just as vibrant today as it was when originally used hundreds of years ago. I found a store that offered Maya Blue as a dry pigment, but having never used a pigment to dye yarn before, I decided to forgo this level of authenticity in creating this piece. I hope to practice with natural dyes in the future, however, so I can begin using them in my weaving.
Changing Techniques
After graphing the storyboard design, I warped my loom to use a pick-up weaving technique to create the piece. As far as I could tell from images of people weaving from the Aztec codices, they would have used pick-up weaving to attain any woven-in designs in their pieces. Pick-up weaving involves lifting strings following a graphed out pattern, so the pattern strings show on the top of the piece, while the rest of the strings form the back of the band. None of the images I found in my research included the cards that were common for tablet weaving in Europe. Traditionally Aztec weavers would have used a backstrap loom, but for ease of transport, I used a box loom. An image of a young girl being taught to weave on a backstrap loom can be seen in this page from the Codex Mendoza. The photo on the right is my original setup on my loom, using a rigid heddle to help keep the strings separated.
The first few lines I tried to weave using the pick-up technique were not easy, as it is a technique I’d used only once before, about three years ago. After several failed attempts, and a quick glance at my calendar, I decided to switch to a weaving technique I was more familiar with in order to complete my project in time. I converted my pick-up weaving to double-faced weaving, a style of card weaving that allows you to weave a complex pattern with a simple warp. Switching to double-faced weaving, however, required me to rewrite my pattern, as this technique stretches the design lengthwise. I decided to rewrite as I went, which worked well for the letters. The sun required slightly more planning and I had to sacrifice some of the intricacies I originally wanted to include.
Loom setup after converting loom to card weaving
As soon as I started weaving I knew I made the right choice; I was easily able to go through my pattern and wove at a good pace during my breaks at work. Though Aztec weavers did not use double-faced card weaving to include details in their cloth, it was the easiest technique for me to use to accomplish this project. In Aztec and traditional Mexican weaving, most details would be embroidered or painted onto the fabric after the piece was sewn together. To embellish my band, I chose to paint over the arrowheads and the winter star at the end of the piece in order to highlight these elements. I am not at all skilled in embroidery, which is why I chose to use a layer of watered-down paint.
Mistakes, Missed Steps, and Misweavings
When I explain double-faced weaving to people, I use the phrase, “If you can graph it, you can weave it.” While this is ostensibly true, there are some caveats; namely the aspect ratio is much different in the woven product. My first graphed pattern, which I spent a couple hours on, would now be stretched about twice as long as I wove it. I rewrote my pattern as I went, making sure to carefully graph it as I made the new images, but even then, I’m sure I unintentionally changed the pattern without marking it. I was never quite happy with the sun, which is why there are different versions in the finished piece, and though I swear I wove the morning star the exact way it was written, it inexplicably shows up three different ways on the band.
After weaving for the first few hours, I found the need to re-warp the remaining unwoven part of the band as the border strings were becoming too tight to move the band forward on the loom. When I untied everything I realized two strings were wrapped in the opposite direction from all the others, preventing me from keeping the tension of the band even. After rewarping it, my tension immediately improved which produced an abrupt shift in the width as I was finally able to pull the weft strand through properly. This resulted in my band appearing distinctly wider at the beginning and skinnier at the end.
This band is hardly my best work, and I almost didn’t want to enter it into any competitions as it doesn’t represent the quality of weaving I can produce. Competition entries tend to show a maker’s best techniques, with perfect measurements and no flaws. The goal of this endeavor was not to produce perfection, but rather to produce a piece of weaving I had never seen another person present. Despite my critiques of the finished product’s quality, I am happy with what I accomplished. The width might be different throughout the band, and the images may not be a consistent size or shape (even though I used the same graph), but I still created a piece I am proud of.
Completed band, submitted to Bhakail’s A&S Competition
Worldly Concerns
When starting out on this grand weaving adventure, I worried my project would not be considered “period enough” to enter into a competition. Yes, figures were depicted in Aztec art, but their weaving was mostly utilitarian, either plain colors or with simple geometric designs. Sure, they painted images of their gods, but never a full storyline of their creation. In fact, the only example I can think of where a story is depicted entirely through cloth is the Bayeux Tapestry, which was created in 11th-century Europe, and done by embroidery rather than weaving. The concept of weaving an entire story was probably not one the Aztecs would have embraced, as weaving was time consuming and would have been saved for garments and bags that had a practical use. As I mentioned before, any elaborate decoration added to these garments would have either been embroidered or painted on at the end. Simple color changes such as stripes or geometric designs would have been woven in, but nothing like the story board I created.
This gave me pause for a bit, as I wasn’t sure how my woven piece would be taken in a historical context. I was interested in weaving something different and wasn’t terribly concerned that it wasn’t based on an actual extant piece. I was also worried that this project would be viewed negatively because it is not strictly European in scope. When researching medieval weaving one encounters burial finds from Viking culture, but no information about weaving in the Americas, even though the Aztecs and Mayans lived during this time period as well. In fact, South America has such a rich weaving culture throughout history that many of their techniques and designs are still used today. I hope to continue in this vein if I continue competing with woven pieces, bringing the A&S community’s attention to weaving traditions outside of Europe, as it is a craft that has been cherished all over the world.
After the Competition…
I entered and won my Barony’s Arts & Sciences competition for which this band was created! It was well received by all who saw it, and I enjoyed telling the judges about my experience weaving it. One suggestion I received from the judges was to rework the band in the method originally intended – pick-up weaving. I decided I would try it if I had the opportunity, not knowing when that time might come.
And then a pandemic hit.
Torn between ambitious weaving projects and suddenly having time to catch up on 30+ years of lost sleep… Sleep mostly won. Eventually I found my motivation again and started warping my loom to remake the Aztec band. It took a few days to remember how to use the proper technique for pick-up weaving, and I had to rewrite my pattern again to account for the change in scale from the drawing to the actual woven band, but the final product came out closer to the original intent, minus the change in band width that so vexed me the first time.
Completed remake, using notes given at A&S Competition
I’m glad I had the time to remake the band closer to how I originally intended. The comments I received at Bhakail’s A&S competition were a good, constructive start to learning how to turn criticism of my work into productivity. I shared my progress on the new band with the Baron, who had given the most notes on my piece at Yule, and he was happy to see me follow through with the changes he recommended. I am glad I have had the opportunity to share work from the New World over the past year, and to bring more knowledge of ancient weaving techniques from other cultures into the scope of my SCA. I hope to be able to continue my research in this region and other lesser-known areas in order to expand my own knowledge and perhaps find other weaving challenges to conquer.
Ok… Well… It’s been *mumbledy* years since I’ve written here, for which I feel immensely guilty. I mostly keep my projects posted on Facebook, which doesn’t allow for a lot of background information to be shared. So here, my resolution to update this blog!
But where to start.
I have continued to weave, though the quantity has probably decreased since starting. I have, however, begun to teach a class I call “Intro to Card Weaving: How to Not Be Afraid of Your Loom.” I have taught at two Nova Scholas in the Shire of Hartshorn-dale and at two Pennsics so far, and I love every minute. This year I was even asked to come to someone’s camp to teach three people individually, and it was one of the highlights of my year. I love watching the “lightbulb” moment when someone finally understands a concept they’ve been struggling with, and it’s been my inspiration to keep teaching tablet weaving.
Most of my projects have been completed for people who won my posts in the East Kingdom travel auctions. For those from out-of-kingdom (or out-of-SCA), an online auction is hosted for each upcoming reign to raise money for their travel fund, and I always post an offering of custom woven trim for the winner.
Auction winnings.
I’ve woven some trim for royals in the past few years…
And I’ve done a couple creative things I’m pretty proud of.
Team Blue Square! I wrote the pattern and test-wove a few different tail variations before deciding on one.Trim that was sewn to the Bhakail Arts & Sciences Championship cloak. I won the competition in 2019 with my Aztec band.
More detailed posts to come on my bigger projects. I promise. For real this time.
“And the Lord said to Moses: Speak to the Israelite people and instruct them to make for themselves fringes on the corners of their garments throughout the ages…” (Numbers 15:38)
Unless part of the most observant sects of Judaism, most modern Jews only follow this commandment when donning tallit, traditional prayer shawls with knotted fringes on each corner. A tallis (plural – tallit) is a prayer shawl that is worn over the shoulders by Jewish people over the age of 13. A person is generally given a tallis when celebrating their bar or bat mitzvah at the age of 13, which is seen as a turning point in a Jewish person’s life – when they start being counted as an adult in the Jewish community.
When I was 12 years old, my mother presented me with the opportunity to weave my own tallis for my bat mitzvah. She had a floor loom and I had a childhood full of learning every textile craft I could get my hands on, so we embarked on this project together. I researched the meanings of different colors to include, decided on how many stripes I wanted in it, and did all the math necessary to calculate how many strands of yarn I needed to warp. I proudly wore that tallis on the day of my bat mitzvah and continued to do so on every major holiday after that.
After learning the Barony of Iron Bog would be hosting a Bog Mitzvah in the spring of 2020 to celebrate their 13th year as a barony, I immediately volunteered to help in any way I possibly could. The idea of a Bog Mitzvah intrigued me so much, I sat with the Baroness at an event and started writing out every small detail I could think of that would celebrate this milestone in a “traditional” way. It took me a few days of processing my ideas before I came up with the thought of weaving tallit for the Baron and Baroness. They were thrilled with the idea, so I started planning.
I chose the colors, I did all the math. I took my new-to-me loom to my local yarn shop to make sure I had all the correct parts. I double checked the math. I started warping. I had to leave my loom at my parents’ house as I have two *very* helpful cats at home, so I was only able to work on the project periodically after work. I started weaving. The math was wrong (isn’t it always?). I rewarped the entire loom and started over.
Beginning to weave the first tallis.
Warping a four-harness loom is much different than warping the inkle loom I usually work on, and I found weaving on it to be equally challenging, as it used an entirely different set of skills. While tablet weaving on an inkle loom requires closely following a pattern and working with very narrow bands, weaving the tallit required much more upper body movement to raise and lower the harnesses, as well as keeping the width consistent on a much bigger loom. There is little historical research on how a tallis would have been woven in the past, but my assumption is that before the invention of a harness loom, a weaver would have used a backstrap loom to complete the project.
The Jewish calendar revolves around holidays that reflect the changing seasons, and I was feeling the same about the Bog Mitzvah. It was to be one of the first events in the spring of 2020, after a long winter of indoor events, I was very much looking forward to celebrating with my friends outside in the warm spring air. Alas, it was never meant to be, as the pandemic canceled every Known World event for far longer than any of us wanted. The spring I so anticipated was gone, as was the entire year after it. I was incredibly disappointed after working so hard on this project, that it wouldn’t get to be used for the Bog Mitzvah. As a person is usually given their first tallis at their bar or bat mitzvah, I was especially looking forward to honoring the Barony of Iron Bog in this way, as silly as it might seem.
While researching the history of the tallis, there is actually very little information in historical record that can date the tallis back to any particular time. The Torah commands it to be woven from a single material, usually wool or linen, and that it must have fringes tied to each corner, indicating that the original garment was most likely a large rectangular piece of fabric worn draped around the body. Tallit were traditionally worn only by men, as a reminder to follow God’s commandments, though more recently women have started wearing them during prayer in some sects.
The only research I could turn up about tallit in the past was about the particular blue dye used for the tzitzit – the fringes on the corners of a tallis. I was not able to find any archaeological records of tallit before the 19th century, and I am unsure if this is because of the delicate nature of fiber from the past, or because artifacts of this level of importance would have been passed down through generations and used until they no longer resembled their original form. Another possibility, of course, is that any existing tallit would have been destroyed in the Holocaust, but that wouldn’t account for artifacts still buried and not yet discovered.
As a weaver, it is possible my persona would have been commissioned to make a tallis, depending on my skill and level of religious practice. In most societies, women were responsible for the creation of textiles, but as tallit were religious objects only worn by men, it is also conceivable that only men were allowed to create them. Traditionally, tallit were all white or included some blue, but after speaking with the Baron and Baroness of Iron Bog, I decided on black, white, and silver as a color scheme for them. Modernly, tallit are now known as works of art, and can be found in a wide variety of materials, colors, and patterns.
Black and silver stripes in the white tallis.Completed tallit.
In a normal world, I would be at the beginning of Renaissance Faire season. I would be working every weekend at my friend’s shop, hanging lanterns and talking about yurts. If I wasn’t at the faire, I would be in the workshop, sewing yurts. My entire faire season revolves around yurts.
In my “free time” I would be panic sewing for Pennsic, attending weekend SCA camping events, and weaving last-minute projects for A&S displays. I would be checking my camping supplies and making sure I had enough sunscreen to last me through my day job and my weekend hobbies.
But this is no longer a normal world.
We are not allowed to gather. We cannot have our weekend camping events. Pennsic is cancelled. And instead of sewing yurts or garb, I’m sewing masks. Masks, masks, masks. In the last five weeks, I have created over 300 masks, and I have more on my work table right now. Adult masks, toddler masks. Matching father/son masks. Joke masks made of sparkly swimsuit material.
What hasn’t changed, however, is my sewing helpers. They are *so* very helpful.
I’m even getting help right now, writing this post.
An SCA competition called St. Eligius caught my attention last fall as a good way to get a start in A&S competitions. I had a plan for a weaving project for Bhakail’s Yule A&S competition that coming December, so I figured I could enter that piece in progress into St. Eligius. It would be my first competition, so I was interested to see what it would be like, how I would be judged, and what the overall experience would be.
The event was both exactly like I imagined and also nothing like I could have pictured. I have always enjoyed presenting things, from science fair projects in middle school to woven projects at SCA display tables at Pennsic. I anticipated putting out my work, needing to be at my table for a certain amount of time answering questions, and spending the rest of my time wandering around and looking at everyone else’s projects. Instead, I barely left my spot at the table – I was having way too much fun talking about my own work to everyone that had questions.
The idea for this woven piece came from the proposed theme for Bhakail’s A&S competition – “Winter Myths and Legends.” Not wanting to just weave some Santa Clause faces on trim, I started a search for “winter legends” and came across the creation myth for the Aztec god of winter, Itzlacoliuhqui. His creation story was interesting, and could be depicted fairly easily in pictographs much like one would see in archaeological rock art. My academic background is in anthropology and archaeology, and I had spent a lot of time studying South America, so I found the idea of weaving this story even more intriguing as time went on. I graphed out a story board and started weaving.
I started weaving using the pick-up method, which would have been the preferred method of detail weaving at the time had the Aztecs included woven trim on their clothing. In fact, they were so utilitarian with their fabric and clothing that decorative trim was rarely used, and usually only given as payment to the upper class. I discovered that cotton was actually a period-accurate material in Mexico and South America at the time, but again was only used as offerings to the upper class. Common fabric was woven out of yucca or palm fiber, which would be prohibitive for me to try to find, so I used cotton instead.
Pick-up weaving is a technique I had only tried once prior to this project, and my time was severely limited, so I decided to switch techniques and use double-faced double-weaving to get this band done. Despite being a European weaving method, it is one I am more comfortable and practiced with so I felt more secure in using it to finish the project. It went fairly smoothly after that, and I was able to present a significant amount of it at St. Eligius.
My display at St. Eligius
My project gained a lot of interest for being “New World” as most A&S projects are Euro-centric. I was able to speak to a lot of people about my interest in bringing attention to the textile history of the Americas and it seemed well-received. And though I didn’t win anything in the competition, my project was called out in court as one the Baronesses of the area were particularly interested in. A lot of people seemed to enjoy my writing style as well, and one gentle gave me her “populace choice” vote for “making her giggle” with my documentation wording.
Tokens I was given for competing.
After I finished weaving the band, I went on to enter it into Bhakail’s competition in December and won, becoming the Barony’s new A&S champion for the year. Despite having an extraordinarily difficult day for personal reasons, winning the baronial competition made me incredibly proud of the work I had done.
Finished piece at Bhakail’s Yule A&S Competition
If you are interested in reading the documentation presented with this project, you can find it here: Itzlacoliuhqui Documentation.
… to actually get me to update my blog, apparently.
Well, it’s been almost a year since I’ve written anything here. Life took several turns after my last posts, and updating this website was not at the top of my list of things to accomplish. Now that my life has settled into something resembling calm, I suppose it’s time to put up some of the projects I’ve worked on recently. Ironically, during a worldwide pandemic, I am the healthiest I’ve been since my last post, when I took a job at a daycare and started spending my time with a bunch of two-year-olds. No time like the present to share what I’ve been up to!
Every so often I get a break from the weaving bug and spend some time crocheting. This year it was spurred by the auction to raise money for their Majesties of the East, where I donated two crocheted items – a dragon and an Infinity Gauntlet from the Marvel universe. The latter was done mostly as a joke, someone asked online if anyone could make it and I decided to take the plunge.
Auction Dragon
One of the pieces I put up for auction was a custom-colored crocheted dragon. A woman won the dragon and chose black and gray for her toddler.
Infinity Gauntlet
I have never made a glove before because of the difficulty involved, but when the opportunity came up to create an Infinity Gauntlet I decided to jump on it. It took a lot of ripping and redoing, but eventually I finished it and shipped it off to the recipient.
Another Dragon
A friend of mine made a request for a dragon so I made another one in the same design as the auction dragon.
Baby Nephew Needs Presents!
Last winter I found out I would be an aunt for the first time, and that my new nephew’s room would be decorated in an animal theme. After literally taking the project away from my mother, I was able to put together a few stuffed critters to decorate baby M’s room.
It’s been a while since I’ve updated! Here’s a bunch of things I’ve woven over the last few months…
Birka Trim
These two pieces were made for Their Majesties of the East Kingdom for Birka. The costume contest theme was “superheroes” and Their Majesties decided on Nightcrawler and Emma Frost in a Viking style. This pattern is actually based on a historical weaving pattern found in the Birka grave finds.
Estrella Trim
Every year I create trim for my Peer to bring with him to Estrella War, in the kingdom of Atenveldt. He stays with the royal encampment and gives the trim to his hosts as a gift of thanks. This is my third year making trim for him to bring, and this might be one of my favorite patterns I’ve woven.]
Fortune’s Favor Test Weave
When Her Majesty Fortune’s favor design came out, a friend of mine started working on a weaving pattern and asked me to test it out for her. I wove it three different ways, following the pattern as written, and provided feedback to Lady Arabella, who wrote the pattern.
Pelican Bag Strap
When my friend Maistir Mael Eoin asked me to be his protege, I knew I wanted to make him a gift for my “belting” ceremony. I found a pattern for a double-faced pattern for pelicans in a Peruvian style from an article about woven rugs (https://www2.cs.arizona.edu/patterns/weaving/articles/tw_6_4-03.pdf). I attached this strap to a canvas bag so he can wear it around at events.
Tunic Trim
Also for Maistir Mael Eoin, trim for a tunic he was gifted for the holidays. After an initial failure of a pattern I found on Pinterest, I chose a secondary pattern that closely matched the original and wove it in his colors.
Bells for Carillion
When Mistress Ty told me she would be invested as Baroness of Carillion, I asked if she wanted me to weave trim for her dress. The only design that made sense? Bells! I wrote a pattern using 6-hole cards and wove 7 yards of trim for her. After sending it off, she decided to use it for Birka instead of Investiture, so hopefully I will see pictures of it after that!
In the Society for Creative Anachronism, the world is divided into kingdoms, which are then divided into baronies, shires, and cantons. Recently, a shire close to me celebrated their first day as a barony – they had an Investiture ceremony to put a new Baron and Baroness in charge of the Barony of Buckland Cross. Their device, the picture that represents their group, is of two deer. I wanted to make a gift for their Excellencies to celebrate their first day as Baron and Baroness and came across a pattern someone from the West Kingdom created years ago of deer heads with antlers. Perfect!
Not so much.
I warped this pattern in silk, my first time using silk for a weaving project, so I wanted to make sure it was perfect. I started weaving.
Everything was wrong.
I got diamonds, Ws, and most confusingly, moose. When I wove the pattern as written, the resulting shape came out distinctively moose-like, which was extremely frustrating. I wanted to weave deer, not moose! I tried my usual trick of reversing the turning directions, but to no avail. I turned to my best resource – the internet.
Thanks to the help of a great friend, who helped me solve my issues through Facebook messenger and a variety of pictures, I was able to puzzle out the problems I was having with my pattern. Turns out, pretty much everything I was doing needed to be flipped 180 degrees. The pattern was showing up on the underside of the band (indicating that the strings on each card were threaded in the wrong order), the threading direction of each card had to be reversed, and I had to turn the cards two turns forward to completely change my starting position.
I don’t know how she was able to figure out these problems by looking at a couple pictures, but Lady Arabella did it, and I owe her the success of this project. I still don’t understand how weaving this band could have been so difficult and caused so many problems after ensuring I warped the band exactly according to the pattern. But alas, some things are meant to be mysteries.
I had a lot of help weaving this band, not only from people giving advice and suggestions online, but also from this little demon. Meet Kubo, my new kitten and loom-eater.